Showing posts with label sewing. Show all posts

Friday, August 24, 2012

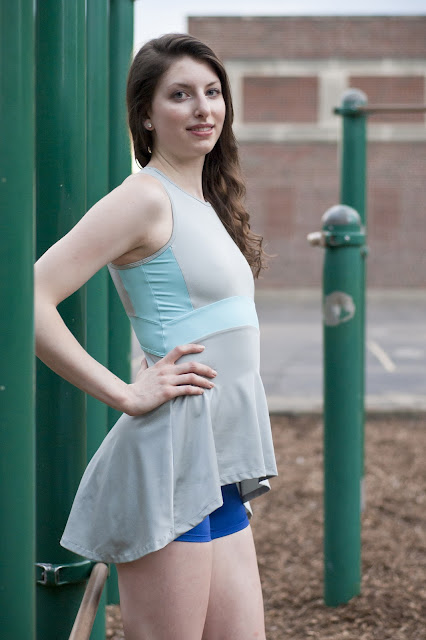
activewear collection

The reason I haven't posted in ages - but it is finally done!


Spandex work out top with nude mesh
Spandex/polyester blend "silky" basketball shorts


Spandex sports bra with nude mesh & hand dyed straps

 
Ponte cover-up sweatshirt


 Spandex leggings


Nylon waterproof running shorts with ponte waistband


Spandex/polyester blend "silky" cut out top


Nylon gym bag


Spandex sports bra with nude mesh & hand dyed straps


Spandex empire running top


Spandex compression shorts


Inspired by highway interchanges; designed & executed by me; photographed by Julia Carleton.

Sunday, June 10, 2012

project : sneak peak


 I've been sewing something secret the past few days, and here are some sneak shots. I'll post the finished garment once I'm done!

Wednesday, December 28, 2011

winter break projects

Having acquired a lovely bag of fabric from New York, I have some projects to catch up on.  Here is what I plan on making with some of it!


 A few months ago I tried on this top on the left from Zara.  It, however, had a large pen mark on it that would never come out (and they refused to mark down the price for me).  I tried it on in a large, which surprisingly ended up being the perfect loose button-down.  I have abandoned the idea of recreating the gathered collar in favor of a more classic shirt collar, but will be using the same slightly buttery white color (silk) and tiny mother of pearl buttons.  I plan to do the blouse with a subtly scooped hem and longer length, like Chiara's shirt on the right, so wear with skinny jeans or to blouse out of a skirt or shorts.


I've been obsessed with this sweater ever since Carol posted about it (by Rag & Bone).  The texture and shape are great.  I have a nubby black and white wool knit that would make a great "sweater tee" - either that or something looser and secured with a decorative clasp.

More to come soon!

Monday, November 14, 2011

tailoring : interior coat construction

What's all that ugly stitching covering the front?

The first few (yes, few) steps of this thing are completed.  So far the canvas has been applied to the front and back, the taping has been done, the seams are sewn, bias edges are stay-stitched for reinforcement, and the shoulder pads have been put in.  The white stitching you see will be removed only when the whole thing is completely finished - basting stitches are used to keep all pieces together and flat, but also to make sure the wool never "droops" and maintains exactly the shape into which it has been manipulated.

 So what exactly am I looking at here, Rachel?

Here is the interior construction of the coat.  Here you can see the goat hair canvas, used for structuring the jacket at pivotal places - mainly the center front, shoulders, and center back neckline.  This creates a strong fit so the coat will not "collapse".  You will also see a white tape along the edges - traditionally used for taping lapel edges (so that the edges are crisp once turned), here I am using them to keep my lines clean and straight. 


These are the shoulder pads!  They are pad-stitched to the canvas and will eventually (well, all of this will be eventually) enclosed within the lining so it is never seen.  The beauty of tailoring is such a hidden art. 

 Close-up of the taping, canvas, and basting stitches on the front of the coat.


But I know what you really came for.  Due to ... interesting shipping situations (i.e. letting my responsible-for-my-future-and-general-well-being-for-the-next-three-weeks crystals sit in a warehouse for 7 days before actually being shipped) the waistband is still only halfway done.  But here, somewhat folded in half so you can better visualize what it will eventually look like, is what it will eventually look like, just not as good as it will actually eventually look like. 

The tricky thing about tailoring is because you don't remove those basting stitches til the end, it is very hard to accurately visualize how nice things will be once they are finished.  But those ugly white stitches are always in the way!  I know.

 At left, where I have yet to pick up again.  

And for now, there you have it!  More updates to come soon as my pant/lining fabric arrives (as well as the crystals, which should be here tomorrow).  I'm pretty much at a stand-still for the moment until the beading is done.  

Can you guess what I'll be doing for the next few days?

Wednesday, September 7, 2011

how to : sew a baby hem

One of the benefits of an internship (one of the million benefits, I should say) is learning amazing techniques you may not otherwise stumble upon elsewhere.  Today I learned a method of sewing a baby hem (or a narrow rolled hem, used for hemming chiffon and very delicate fabric) from Sam and the Row's amazing tailor, Ivan.

In the past, my baby hems have always been ugly.  Frayed ends stick out, the fabric stretches and then curls, and the hem width is horribly uneven.  The trick?  You need something called ban roll, a starched plain-weave tape.  Here is how to use it!


The first step is to prep the ban roll - you will use it to sew the seam, but you will remove it afterwards, so you can use it over and over again (hence buy a large amount, like 5 yards, to cover the maximum amount of hemming you'd ever need for a very full skirt, and you only need to prep once).  Start by trimming off one edge, where the threads are woven a little tighter.  The beauty of ban roll is that it allows you to sew a baby hem as small as possible.  To achieve this, the next step is pulling out around 3 of the lengthwise threads.  You will end up with something that looks like a very short comb, as in the right hand picture.  Since most baby hems are preferred as small as possible, three threads should be all you need to remove (you can remove more, however).


The next step is done incorrectly in the photos, but I will show them anyway for clarification.  Here, you can see that I lined up the ban roll to the edge of the chiffon and pinned (like you would hem tape).  However, for a cleaner finish (and no risk of sewing into a frayed edge that will later come undone), you would really want to pin the ban roll about half an inch from the chiffon edge, so the stitches will catch fabric that has not frayed for a more secure hem.  In the second picture, you can see how the ban roll lines up with the needle - the next step is to stitch up against the woven part of the roll.  You want to make sure your stitching stays within this "comb area", and not into the woven area, because you will be pulling it out later.  If you stitch into the woven area, you cannot pull it out! 


This is where the magic happens.  The next step is to flip the ban roll to the inside, against the wrong side of the fabric, once again just as you would hem tape.  The baby hem, therefor, will wrap around the comb part of the ban roll (which is why it is ideal to only remove about 3 threads or so - again, you can do more, as you are in control of where you place your stitch line, but I found it easier to line up my needle with the edge of the woven section so I kept the comb the width of my desired finished hem).  Once you have wrapped the fabric over the comb section, stitch right down the middle as in the right hand picture.


Once your stitching is finished, press the hem with the ban roll still intact.  Then, carefully pull out the ban roll!  If you stitched correctly, you will have only sewn onto the comb section, and not into the woven section - thus holding the roll into the hem just enough to sew, but then once finished it can simply be pulled straight out!  In the second photo, you can see just how narrow the finished baby hem is - and how straight!  The ban roll is sturdy and does not allow the delicate fabric being hemmed to stretch at all.

I cannot even begin to say how much this technique will impact my sewing skills!   The hem before had always been something I'd dreaded - because I was not proficient enough to sew them beautifully, to me they ruined my garments after they looked almost perfect.  One of the seamstresses swears by ban roll - and sews every seam with it.  Now I can see why.

Hope this makes sense!